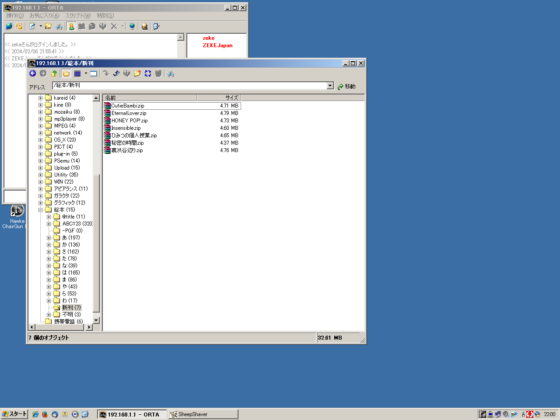
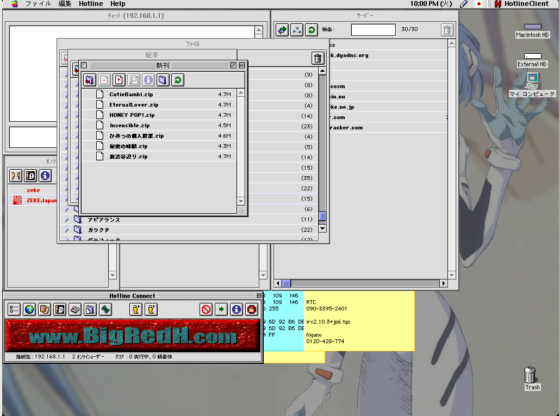
さて、ずっと昔、今でいうSNSのような使い方をされていたHotlineというものがありました。もう今は誰も使っていないだろうけど、サーバだけは維持しています。
今回も、引き続き使えるように構築してみます。
パッケージ化されていないものはコンパイル
マイナーなものはパッケージ化されていないので、Unix版Hotlineのページから、ソースプログラムをダウンロードしてきます。
今回調べてみて、5年前だけどまだ維持されていたのにびっくりです。他の人が引き継いだみたいですね!現行のは2001年版の0.1.41なのでバージョン番号がだいぶ上がっていました。
[root@ace ~]# cd /usr/local/src/
[root@ace src]#
[root@ace src]# wget https://synhxd.sourceforge.net/releases/shxd-0.4.12.tgz
--2024-02-06 14:56:51--  https://synhxd.sourceforge.net/releases/shxd-0.4.12.tgz
synhxd.sourceforge.net (synhxd.sourceforge.net) をDNSに問いあわせています... 2606:4700:4400::6812:256f, 2606:4700:4400::ac40:9691, 172.64.150.145, ...
synhxd.sourceforge.net (synhxd.sourceforge.net)|2606:4700:4400::6812:256f|:443  に接続しています... 接続しました。
HTTP による接続要求を送信しました、応答を待っています... 200 OK
長さ: 289865 (283K) [application/x-gzip]
`shxd-0.4.12.tgz' に保存中

shxd-0.4.12.tgz     100%[===================>] 283.07K   422KB/s 時間 0.7s

2024-02-06 14:56:52 (422 KB/s) - `shxd-0.4.12.tgz' へ保存完了 [289865/289865]

[root@ace src]# tar xvfz shxd-0.4.12.tgz
shxd-0.4.12/
:
省略
:
[root@ace src]# chown -R root:root shxd-0.4.12
[root@ace src]#
ファイルを/usr/local/srcに置いて、解凍しました。
ソースプログラムは、基本的に解凍したディレクトリに降りて、
- ./configure :環境設定
- make :コンパイル
- make install :インストール
の手順で行います。インストールの手順はINSTALLファイルに書かれていますので、それも読んでおきます。
[root@ace src]# cd shxd-0.4.12
[root@ace shxd-0.4.12]# ./configure --help
Usage: configure [options] [host]
Options: [defaults in brackets after descriptions]
Configuration:
  --cache-file=FILE       cache test results in FILE
  --help                  print this message
  --no-create             do not create output files
  --quiet, --silent       do not print `checking...' messages
  --version               print the version of autoconf that created configure
Directory and file names:
  --prefix=PREFIX         install architecture-independent files in PREFIX
                          [/usr/local/shxd]
  --exec-prefix=EPREFIX   install architecture-dependent files in EPREFIX
                          [same as prefix]
  --bindir=DIR            user executables in DIR [EPREFIX/bin]
  --sbindir=DIR           system admin executables in DIR [EPREFIX/sbin]
  --libexecdir=DIR        program executables in DIR [EPREFIX/libexec]
  --datadir=DIR           read-only architecture-independent data in DIR
                          [PREFIX/share]
  --sysconfdir=DIR        read-only single-machine data in DIR [PREFIX/etc]
  --sharedstatedir=DIR    modifiable architecture-independent data in DIR
                          [PREFIX/com]
  --localstatedir=DIR     modifiable single-machine data in DIR [PREFIX/var]
  --libdir=DIR            object code libraries in DIR [EPREFIX/lib]
  --includedir=DIR        C header files in DIR [PREFIX/include]
  --oldincludedir=DIR     C header files for non-gcc in DIR [/usr/include]
  --infodir=DIR           info documentation in DIR [PREFIX/info]
  --mandir=DIR            man documentation in DIR [PREFIX/man]
  --srcdir=DIR            find the sources in DIR [configure dir or ..]
  --program-prefix=PREFIX prepend PREFIX to installed program names
  --program-suffix=SUFFIX append SUFFIX to installed program names
  --program-transform-name=PROGRAM
                          run sed PROGRAM on installed program names
Host type:
  --build=BUILD           configure for building on BUILD [BUILD=HOST]
  --host=HOST             configure for HOST [guessed]
  --target=TARGET         configure for TARGET [TARGET=HOST]
Features and packages:
  --disable-FEATURE       do not include FEATURE (same as --enable-FEATURE=no)
  --enable-FEATURE[=ARG]  include FEATURE [ARG=yes]
  --with-PACKAGE[=ARG]    use PACKAGE [ARG=yes]
  --without-PACKAGE       do not use PACKAGE (same as --with-PACKAGE=no)
  --x-includes=DIR        X include files are in DIR
  --x-libraries=DIR       X library files are in DIR
--enable and --with options recognized:
  --enable-stdarg            Enable the explicit use of stdarg.h
  --enable-warnings          Show compiler warnings
  --disable-hotline-server   Don't compile hotline server
  --enable-tracker-server    compile tracker server
  --enable-socket-linger     enable the SO_LINGER socket option
  --enable-xmalloc-debug     Do some simple malloc debugging
  --enable-htxf-pthread      use pthread instead of fork or clone for htxf
  --enable-htxf-clone        use clone instead of pthread or fork for htxf
  --enable-htxf-preview      enable image preview (needs ImageMagick)
  --enable-hope              enable HOPE
  --enable-cipher            enable cipher
  --enable-cipher-idea       enable idea cipher
  --enable-compress          enable compress
  --enable-network           enable network
  --enable-sql               use mysql logging
  --enable-ipv6              IPv6 support. IPv4 will not work
  --with-socks[=dir]         use socks library in dir
  --with-socks-include=dir   use socks header in dir
[root@ace shxd-0.4.12]#
configureのオプションを見ると、インストール場所が「/usr/local/shxd」になっています。ここに、プログラム本体やデータを入れることになります。
また、INSTALLファイルによると、–enable-htxf-pthreadをつけるのが推奨だそうです。
RHELのお作法は、まだよくわかっていませんが、/opt/shxdのほうが良いのかな?ってことで、–prefix=/opt/shxd をつけて、configureをかけて見ましょう。
[root@ace shxd-0.4.12]# ./configure --prefix=/opt/shxd  --enable-htxf-pthread
creating cache ./config.cache
checking host system type... Invalid configuration `x86_64-unknown-linux-gnu': machine `x86_64-unknown' not recognized
:
省略
:
creating ./config.status
creating ./makefile
creating ./src/Makefile
creating ./src/hfs/Makefile
creating ./src/apple/Makefile
creating include/config.h
[root@ace shxd-0.4.12]#
次にmakeです。
[root@ace shxd-0.4.12]# make
Making all in src...
make[1]: ディレクトリ '/usr/src/shxd-0.4.12/src' に入ります
Making all in hfs...
:
省略
:
gcc -g -DHAVE_CONFIG_H  rcv.o accounts.o chat.o commands.o transactions.o files.o hlserver.o htxf.o hxd_config.o ident.o news.o string_m.o  hxd_main.o hxd_hlwrite.o hxd_tracker.o fd.o version.o xmalloc.o decode.o snprintf.o inet_ntoa_r.o -lpthread hfs/hfs.o apple/alias.o apple/files.o apple/mac_errno.o apple/mac_string.o apple/unicode.o  -o ../run/hxd
make: success -> binary should be in `run'
make[1]: ディレクトリ '/usr/src/shxd-0.4.12/src' から出ます
[root@ace shxd-0.4.12]#
特にエラーもないので、インストールします。
[root@ace shxd-0.4.12]# make install
Making install in src...
make[1]: ディレクトリ '/usr/src/shxd-0.4.12/src' に入ります
make[1]: 'install' に対して行うべき事はありません.
make[1]: ディレクトリ '/usr/src/shxd-0.4.12/src' から出ます
installation: installing into /opt/shxd
cp -f run/hxd /opt/shxd/hxd;
complete.
[root@ace shxd-0.4.12]#
インストールされたディレクトリに移動して、設定変更します。
セキュリティを考慮して環境設定
[root@ace shxd-0.4.12]# cd /opt/shxd/
[root@ace shxd]# ls -al
合計 576
drwxr-xr-x 5 root root     98  2月  6 15:10 .
drwxr-xr-x 3 root root     18  2月  6 15:10 ..
-rw-r--r-- 1 root root    237  2月  6 15:10 README
drwxr-xr-x 4 root root     32  2月  6 15:10 accounts
drwxr-xr-x 3 root root    164  2月  6 15:10 etc
drwxr-xr-x 2 root root    166  2月  6 15:10 exec
-rwxr-xr-x 1 root root 571616  2月  6 15:10 hxd
-rw-r--r-- 1 root root   5319  2月  6 15:10 hxd.conf
-rw-r--r-- 1 root root     22  2月  6 15:10 news
[root@ace shxd]# groupadd -r shxd
[root@ace shxd]# adduser -d /opt/shxd -g shxd -r -s /sbin/nologin shxd
[root@ace shxd]# chown -R shxd:shxd .
[root@ace shxd]# chmod -R o-rwx .
[root@ace shxd]# ls -alR
.:
合計 576
drwxr-x--- 5 shxd shxd     98  2月  6 15:10 .
drwxr-xr-x 3 root root     18  2月  6 15:10 ..
-rw-r----- 1 shxd shxd    237  2月  6 15:10 README
drwxr-x--- 4 shxd shxd     32  2月  6 15:10 accounts
drwxr-x--- 3 shxd shxd    164  2月  6 15:10 etc
drwxr-x--- 2 shxd shxd    166  2月  6 15:10 exec
-rwxr-x--- 1 shxd shxd 571616  2月  6 15:10 hxd
-rw-r----- 1 shxd shxd   5319  2月  6 15:10 hxd.conf
-rw-r----- 1 shxd shxd     22  2月  6 15:10 news
:
省略
:
./exec:
合計 76
drwxr-x--- 2 shxd shxd  166  2月  6 15:10 .
drwxr-x--- 5 shxd shxd   98  2月  6 15:10 ..
-rwxr-x--- 1 shxd shxd 9421  2月  6 15:10 accounts
-rwxr-x--- 1 shxd shxd 6969  2月  6 15:10 find
-rwxr-x--- 1 shxd shxd 4161  2月  6 15:10 help
-rwxr-x--- 1 shxd shxd  304  2月  6 15:10 login
-rwxr-x--- 1 shxd shxd 6435  2月  6 15:10 ls-exec
-rwxr-x--- 1 shxd shxd 5746  2月  6 15:10 mail
-rwxr-x--- 1 shxd shxd 5601  2月  6 15:10 netstat
-rwxr-x--- 1 shxd shxd   10  2月  6 15:10 ping
-rwxr-x--- 1 shxd shxd 1870  2月  6 15:10 seen
-rwxr-x--- 1 shxd shxd  185  2月  6 15:10 uname
-rwxr-x--- 1 shxd shxd  185  2月  6 15:10 uptime
-rwxr-x--- 1 shxd shxd  354  2月  6 15:10 whoami
[root@ace shxd]#
サーバを起動するための専用ユーザ、グループを作成します。
また、サーバ内のデータも、ここに格納しますが、他の人に見られないようにotherに対して読み書き実行権限を外しておきます。
[root@ace shxd]# cat /etc/passwd | grep shxd
shxd:x:991:991::/opt/shxd:/sbin/nologin
[root@ace shxd]#
[root@ace shxd]# cp -p hxd.conf hxd.conf.orig
[root@ace shxd]# vi hxd.conf
[root@ace shxd]# diff hxd.conf hxd.conf.orig
10c10
<    away_time 3600;
---
>    away_time 300;
13c13
<    gid 991;
---
>    gid -1;
16c16
<    uid 991;
---
>    uid -1;
33c33
<    enable-hfs no;
---
>    enable-hfs yes;
48c48
<    enable-cipher no;
---
>    enable-cipher yes;
79,80c79,80
<    individual_downloads 64;
<    individual_uploads 64;
---
>    individual_downloads 2;
>    individual_uploads 2;
132c132
<    log "./files/Drop Box/hotline.log";
---
>    log "./log";
[root@ace shxd]#
hxd.confを編集します。作成したユーザ、グループを指定すれば、デーモンをそのユーザで起動してくれます。これはdnsサーバと同様に、サーバプログラムの脆弱性などにより侵入されても、最低限の権限しか持てないようにするためです。
その他は現行に合わせて、適当に編集です。
[root@ace shxd]# scp -pr ns.zeke.ne.jp:/home/hotline/files .
root@ns.zeke.ne.jp's password:
:
省略
:
[root@ace shxd]#
[root@ace shxd]# ls -al accounts/
合計 0
drwxr-x--- 4 shxd shxd  32  2月  6 15:10 .
drwxr-x--- 6 shxd shxd 132  2月  6 17:10 ..
drwxr-x--- 2 shxd shxd  48  2月  6 15:10 admin
drwxr-x--- 2 shxd shxd  22  2月  6 15:10 guest
[root@ace shxd]# rm -r accounts/*
rm: ディレクトリ 'accounts/admin' 配下に入りますか? y
rm: 通常ファイル 'accounts/admin/UserData' を削除しますか? y
rm: 通常ファイル 'accounts/admin/access' を削除しますか? y
rm: 通常ファイル 'accounts/admin/conf' を削除しますか? y
rm: ディレクトリ 'accounts/admin' を削除しますか? y
rm: ディレクトリ 'accounts/guest' 配下に入りますか? y
rm: 通常ファイル 'accounts/guest/UserData' を削除しますか? y
rm: ディレクトリ 'accounts/guest' を削除しますか? y
[root@ace shxd]#
[root@ace shxd]# ls -al accounts/
合計 0
drwxr-x--- 2 shxd shxd   6  2月  6 21:46 .
drwxr-x--- 6 shxd shxd 132  2月  6 17:10 ..
[root@ace shxd]# scp -pr 192.168.1.4:/home/hotline/accounts/* accounts/
root@192.168.1.4's password:
:
省略
:
[root@ace shxd]# chown -R shxd:shxd .
[root@ace shxd]# chmod -R o-rwx .
[root@ace shxd]# ls -al
合計 588
drwxr-x---  6 shxd shxd    132  2月  6 17:10 .
drwxr-xr-x  3 root root     18  2月  6 15:10 ..
-rw-r-----  1 shxd shxd    237  2月  6 15:10 README
drwxr-x--- 15 shxd shxd    176  2月  6 21:46 accounts
drwxr-x---  3 shxd shxd    164  2月  6 15:10 etc
drwxr-x---  2 shxd shxd    166  2月  6 15:10 exec
drwxr-x--- 38 shxd shxd   4096 12月 22  2003 files
-rwxr-x---  1 shxd shxd 571616  2月  6 15:10 hxd
-rw-r-----  1 shxd shxd   5345  2月  6 15:31 hxd.conf
-rw-r-----  1 shxd shxd   5319  2月  6 15:10 hxd.conf.orig
-rw-r-----  1 shxd shxd     22  2月  6 15:10 news
[root@ace shxd]#
現行から、データファイルなどをコピーしてきます。あらかじめ入っているadminユーザにはパスワードが付いていないので、必ず消しておきます。
コピーが終わったら、もう一度、ユーザと権限を変更しておきます。
設定はちゃんとできたかな?
[root@ace shxd]# ./hxd軽く動作を確認してみます。


WindowsクライアントからもMacクライアントからも、漢字がちゃんと見えるようですね。これで大丈夫でしょう。
RHELのお作法で、自動起動設定する
[root@ace shxd]# vi shxd.sh
[root@ace shxd]# cat shxd.sh
#!/bin/sh
cd /opt/shxd
./hxd

[root@ace shxd]# chmod 750 shxd.sh
[root@ace shxd]# chown shxd:shxd shxd.sh
[root@ace shxd]# ls -l shxd.sh
-rwxr-x--- 1 shxd shxd 30  2月  6 22:51 shxd.sh
[root@ace shxd]#
[root@ace shxd]# touch /etc/systemd/system/shxd.service
[root@ace shxd]# chmod 664 /etc/systemd/system/shxd.service
[root@ace shxd]# vi /etc/systemd/system/shxd.service
[root@ace shxd]# cat /etc/systemd/system/shxd.service
[Unit]
Description=Hotline server daemon
After=network.target

[Service]
ExecStart=/opt/shxd/shxd.sh
Restart=always
Type=simple

[Install]
WantedBy=multi-user.target

[root@ace shxd]# ls -l /etc/systemd/system/shxd.service
-rw-rw-r-- 1 root root 167  2月  6 22:56 /etc/systemd/system/shxd.service
[root@ace shxd]#
次に、自動起動の設定です。
を参考に作ってみました。
[root@ace shxd]# systemctl daemon-reload
[root@ace shxd]# systemctl enable shxd
Created symlink /etc/systemd/system/multi-user.target.wants/shxd.service → /etc/systemd/system/shxd.service.
[root@ace shxd]# systemctl start shxd
[root@ace shxd]# systemctl status shxd
● shxd.service - Hotline server daemon
     Loaded: loaded (/etc/systemd/system/shxd.service; enabled; preset: disable>
     Active: active (running) since Tue 2024-02-06 22:58:48 JST; 32s ago
   Main PID: 1605 (shxd.sh)
      Tasks: 2 (limit: 23114)
     Memory: 640.0K
        CPU: 3ms
     CGroup: /system.slice/shxd.service
             tq1605 /bin/sh /opt/shxd/shxd.sh
             mq1606 ./hxd

 2月 06 22:58:48 ace.zeke.ne.jp systemd[1]: Started Hotline server daemon.
[root@ace shxd]# systemctl stop shxd
[root@ace shxd]# systemctl status shxd
○ shxd.service - Hotline server daemon
     Loaded: loaded (/etc/systemd/system/shxd.service; enabled; preset: disable>
     Active: inactive (dead) since Tue 2024-02-06 22:59:27 JST; 7s ago
   Duration: 39.167s
    Process: 1605 ExecStart=/opt/shxd/shxd.sh (code=killed, signal=TERM)
   Main PID: 1605 (code=killed, signal=TERM)
        CPU: 3ms

 2月 06 22:58:48 ace.zeke.ne.jp systemd[1]: Started Hotline server daemon.
 2月 06 22:59:27 ace.zeke.ne.jp systemd[1]: Stopping Hotline server daemon...
 2月 06 22:59:27 ace.zeke.ne.jp systemd[1]: shxd.service: Deactivated successfu>
 2月 06 22:59:27 ace.zeke.ne.jp systemd[1]: Stopped Hotline server daemon.
[root@ace shxd]# systemctl start shxd
[root@ace shxd]#
自動起動の登録、起動、停止もちゃんとできるようです。
Firewallの穴あけ
最後に、Firewallに穴を開けておきましょう。まだルータの設定をしていないので、外部からはアクセスできませんが。
[root@ace ~]# ss -natup| grep hxd
tcp   LISTEN 0      5                                0.0.0.0:5501                                  0.0.0.0:*     users:(("hxd",pid=1619,fd=2))
tcp   LISTEN 0      5                                0.0.0.0:5500                                  0.0.0.0:*     users:(("hxd",pid=1619,fd=1))
[root@ace ~]#
まずプログラムがどのポートを使っているのかを確認します。5500と5501のtcpのポートですね。
[root@ace ~]# firewall-cmd --list-all
public (active)
  target: default
  icmp-block-inversion: no
  interfaces: enp0s3
  sources:
  services: dns ssh
  ports:
  protocols:
  masquerade: no
  forward-ports:
  source-ports:
  icmp-blocks:
  rich rules:

[root@ace ~]# firewall-cmd --zone=public --permanent --add-port=5500-5501/tcp
success
[root@ace ~]# firewall-cmd --reload
success
[root@ace ~]# firewall-cmd --list-all
public (active)
  target: default
  icmp-block-inversion: no
  interfaces: enp0s3
  sources:
  services: dns ssh
  ports: 5500-5501/tcp
  protocols:
  forward: yes
  masquerade: no
  forward-ports:
  source-ports:
  icmp-blocks:
  rich rules:
[root@ace ~]#
firewall-cmdコマンドで、設定、確認を行って完了です。
お勧めのKindle本です!


コメント
こんにちは。テレホタイムのHotlineが楽しかったことを思い出して、仮想環境のRocky Linux 9.5にインストールしてみました。とても参考になりました。
Hotlineのユーザ追加などのマニュアルはどこかに存在していますか? 探してみたのですが見つけられませんでした。
今のところGuestだけなので淋しいです😢
コメントありがとうございます!
Hotline懐かしいですよね。
特にマニュアルとかは知りませんが、基本的に管理者ユーザログインしてクライアントの操作ですべての設定ができるはずです。
WindowsのORTAというクライアントだと、「操作」→「アカウント」→「新規作成」でユーザが作れそうです。
すっかり使い方を忘れていましたが、サーバ側のパスなしadminを消してしまい、guestだけ残しても何もできないことに気づきました。
のちほど時間のある時にadminで何らかの管理ユーザを作ったのち、adminを消すという順序でやってみます。
ありがとうございます!