以前にも書きましたが、
自宅のネットワーク環境は以下のようになっています。
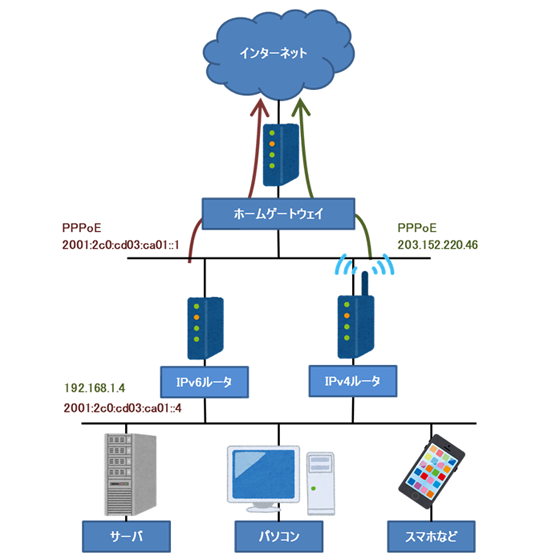
これは、論理的な構成で、物理的には
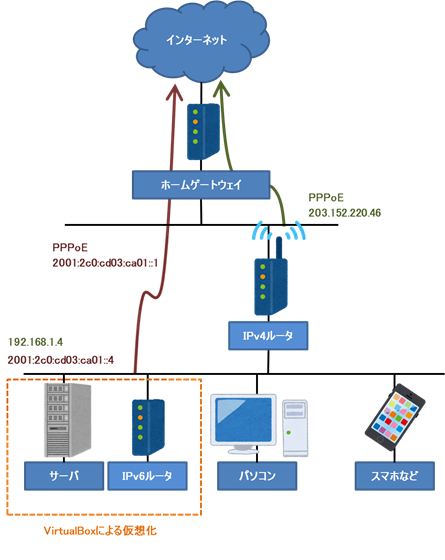
サーバとIPv6ルータを仮想化して、1つパソコンの中で動いています。また、IPv4ルータはPPPoEパススルーの設定にして、IPv6ルータのPPPoEを通すようにしています。
ルータというと、WANとLANなど複数のネットワークそれぞれに異なる口を持っていなくては行けないと思われがちですが、混雑を気にしなければ、このように一つのNICでもOKです。
同様に一つのハブで複数のネットワークを乗せることができます。
しかし、今回の場合、ホームゲートウェイがNTTのNGN網のIPv6アドレスを勝手に配布して、それを切ることができないので、あえて、物理的にLANを分けています。
この、仮想化したIPv6ルータに、IIJのSEIL/x86を使っていました。
実験的に、固定IPv6アドレスでのサーバ公開を行っていたので、できるだけお金をかけない構成にしました。
SEIL/x86をVirtualPCにインストール
SEIL/x86の公式ホームページから、SEIL/x86 Fujiのソフトウェアをダウンロードして・・・って書こうと思ったら、販売は2020年3月31日で終わってしまったようですね。
まぁ、覚書として残しておきましょう。
こちらのページから、SEIL/x86 FujiのVMware形式の最新版をダウンロードと一番最初は起動キーをリクエストします。

ダウンロードファイルを解凍すると、vmware用の仮想マシンファイルができます。
VirtualBoxにはseilx86.ovfとseilx86-ovf.vmdkファイルをインポートして使います。
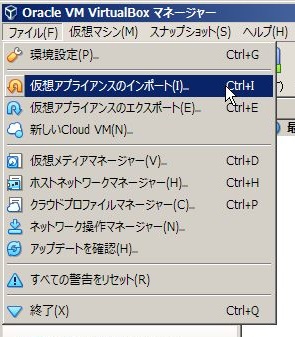
VirtualBoxの「ファイル」メニュー→「仮想アプライアンスのインポート」を選択して

seilx86.ovfファイルを選択します。
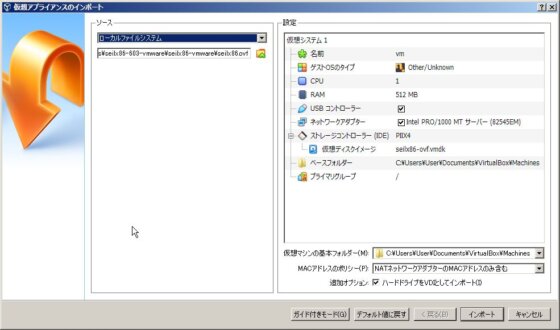
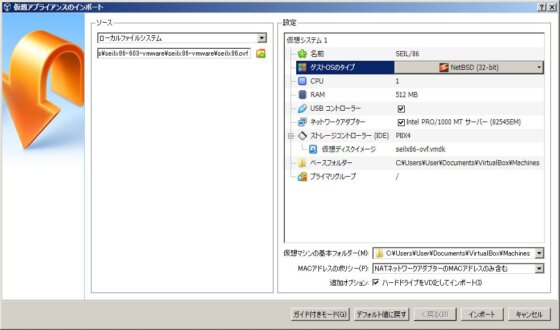
インポート設定画面で名前を適当に、ゲストOSタイプを「NetBSD(32-bit)」に変更します。あまり変わらないかもしれないけど、Seil/x86 FujiはNetBSDをベースに作られてるので。
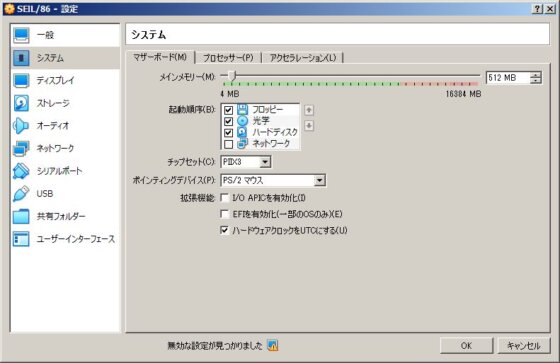
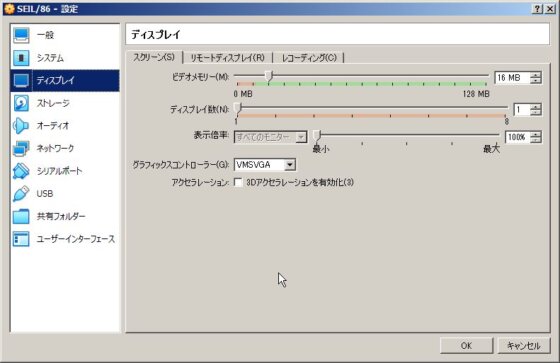
仮想マシンの設定を変更します。
「システム」→「マザーボード」の「ハードウェアクロックをUTCにする」にチェック
「ディスプレイ」→「スクリーン」の「グラフィックスコントローラー」は「VMSVGA」を選択
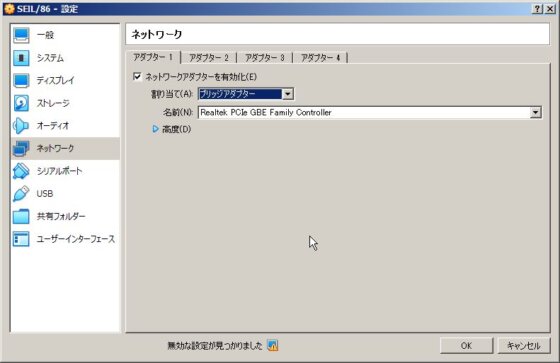
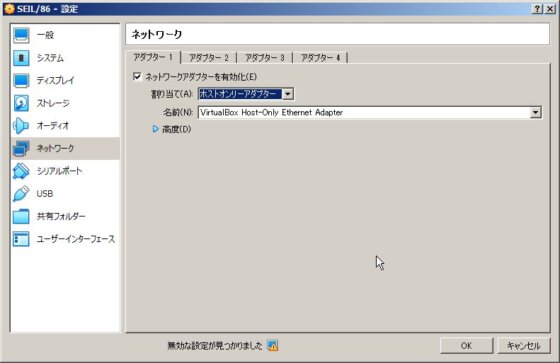
今回は、説明のためにネットワークの設定のブリッジアダプタ(192.168.1.0/24)をホストオンリーアダプタ(192.168.56.0/24)に変更しています。
SEIL/x86の起動と初期設定
まずは、SEILにライセンスキーを入れなければ、いけません。
これについては
に説明があるのですが、ちょこっと変更します。
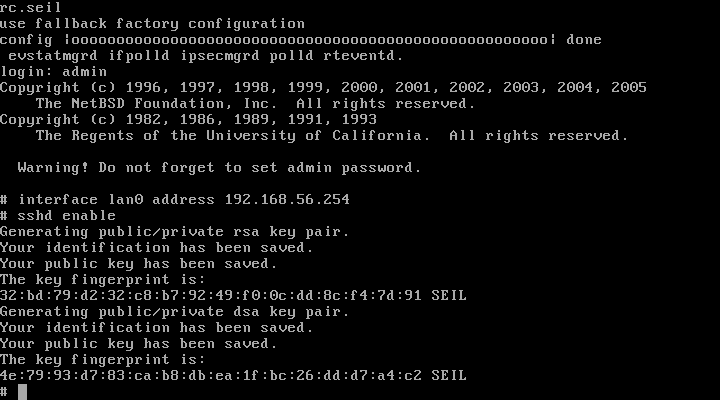
まず、adminでログイン
コマンド interface lan0 address 192.168.56.254 でLANのIPアドレスを設定
コマンド sshd enable でsshdを有効化。
公式サイトではtelnetdを有効化していますが、それだと192.168.0.0/24のネットワークからしか入れないように制限されています。
sshdではそのような制限がないので、こちらを有効化しています。
もちろん後で、制限をかけなければいけません。
さて、Teratermを使って、192.168.56.254 にログインします。
Last login: Sat Apr 18 15:09:36 2020 from 192.168.56.1 on ttyp4
Copyright (c) 1996, 1997, 1998, 1999, 2000, 2001, 2002, 2003, 2004, 2005
    The NetBSD Foundation, Inc.  All rights reserved.
Copyright (c) 1982, 1986, 1989, 1991, 1993
    The Regents of the University of California.  All rights reserved.

  Warning! Do not forget to set admin password.

# install-key from stdin
please enter key data ("." for end of key data)
Starter0*秘密情報*
.OK?[y/N]y
Startup Key:
  Distribution ID : 0001-0000-0000-0086-0001-0000-0000-1665
  Memo            : Distributed via SEIL Community Site.
  Status          : VALID and registered.

# install-key from stdin
please enter key data ("." for end of key data)
FuncKey0*秘密情報*
.OK?[y/N]y
Function Key(s):
  Function : 'save-to' command
  Issued   : 2015/12/15 12:00:00
  Memo     : Delivered via LaIT Supply
  Status   : VALID and registered.

#
install-key from stdin コマンドで、メールに添付されてきた起動キーと機能キーを入力します。
機能キーは当時800円で購入しましたが、saveコマンドが使えるようになるだけなので、VirtualBoxなら、スナップショットで代用できますね。
# save stdout
hostname ""
timezone "Japan"
environment login-timer 300
interface lan0 media auto
interface lan0 add 192.168.56.254/24
bridge disable
bridge ip-bridging on
bridge ipv6-bridging on
route dynamic rip disable
route dynamic ospf disable
route dynamic bgp disable
route dynamic redistribute static-to-rip disable
route dynamic redistribute static-to-ospf disable
route dynamic redistribute ospf-to-rip disable
route dynamic redistribute rip-to-ospf disable
route dynamic redistribute connected-to-rip enable
route dynamic redistribute connected-to-ospf enable
route dynamic pim-sparse disable
route6 dynamic ripng disable
route6 dynamic redistribute static-to-ripng disable
route6 dynamic redistribute connected-to-ripng enable
route6 dynamic pim-sparse disable
filter add seil_ctl_lan0 interface lan0 direction in action pass protocol tcp src 192.168.0.0/24 srcport 0-65535 dst self dstport 0-65535 state disable logging off enable
filter add telnetd_block interface any direction in action block protocol tcp srcport 0-65535 dst self dstport 23 state disable logging on enable
filter add httpd_block interface any direction in action block protocol tcp srcport 0-65535 dst self dstport 80 state disable logging on enable
filter6 add seil_ctl_lan0 interface lan0 direction in action pass protocol tcp src fe80::/10 srcport 0-65535 dst self dstport 0-65535 state disable logging off enable
filter6 add telnetd_block interface any direction in action block protocol tcpudp srcport 0-65535 dst self dstport 23 state disable logging on enable
filter6 add httpd_block interface any direction in action block protocol tcpudp srcport 0-65535 dst self dstport 80 state disable logging on enable
nat timeout 900
nat logging off
nat upnp off
nat upnp interface (null)
proxyarp disable
dhcp disable
dhcp mode server
dhcp6 client disable
dhcp6 client interface lan0
dns forwarder disable
ntp disable
cbq link-bandwidth 100Mbps
snmp disable
snmp community "public"
snmp security-model community-based on
snmp security-model user-based on
snmp trap disable
syslog debug-level off
syslog remote off
translator timeout 300
resolver disable
rtadvd disable
httpd disable
sshd hostkey rsa1 none
sshd hostkey rsa
:
省略
:
sshd hostkey dsa
:
省略
:
sshd enable
telnetd enable
vendor OEM
#
まず、これが初期の設定になります。自分好みに基本設定を入れてきます。
# hostname "gw"
gw# environment login-timer 86400
gw# route dynamic redistribute connected-to-rip disable
gw# route dynamic redistribute connected-to-ospf disable
gw# route6 dynamic redistribute connected-to-ripng disable
gw# httpd enable
gw# ntp enable
gw# ntp mode client
gw# ntp server add 192.168.56.1
gw# resolver enable
gw# resolver address add 192.168.56.1
gw#
まずは、ホスト名を”gw”に、次にログインタイマーが5分では短すぎるので、24時間に、
ダイナミックルーティングは使わないので、disableにしておきます。
hhtdも起動しておきます。
ntpも起動して、サーバと時刻を合わせておきます。
dnsサーバの名前も登録して、ホスト名からIPアドレスが引けるようにしておきます。
gw# filter modify seil_ctl_lan0 interface lan0 direction in action pass protocol tcp src 192.168.56.0/24 srcport 0-65535 dst self dstport 0-65535 state disable logging off enable
gw# filter add sshd_block interface any direction in action block protocol tcp srcport 0-65535 dst self dstport 22 state disable logging on enable
gw# filter6 add sshd_block interface any direction in action block protocol tcpudp srcport 0-65535 dst self dstport 22 state disable logging on enable
gw#
フィルター設定を変更。ローカルのネットワークを192.168.0.0/24から192.168.56.0/24に変更して、その他の自分向けsshdをブロック設定を追加です。
gw# save-to stdout
hostname "gw"
timezone "Japan"
environment login-timer 86400
interface lan0 media auto
interface lan0 add 192.168.56.254/24
bridge disable
bridge ip-bridging on
bridge ipv6-bridging on
route dynamic rip disable
route dynamic ospf disable
route dynamic bgp disable
route dynamic redistribute static-to-rip disable
route dynamic redistribute static-to-ospf disable
route dynamic redistribute ospf-to-rip disable
route dynamic redistribute rip-to-ospf disable
route dynamic redistribute connected-to-rip disable
route dynamic redistribute connected-to-ospf disable
route dynamic pim-sparse disable
route6 dynamic ripng disable
route6 dynamic redistribute static-to-ripng disable
route6 dynamic redistribute connected-to-ripng disable
route6 dynamic pim-sparse disable
filter add seil_ctl_lan0 interface lan0 direction in action pass protocol tcp src 192.168.56.0/24 srcport 0-65535 dst self dstport 0-65535 state disable logging off enable
filter add telnetd_block interface any direction in action block protocol tcp srcport 0-65535 dst self dstport 23 state disable logging on enable
filter add httpd_block interface any direction in action block protocol tcp srcport 0-65535 dst self dstport 80 state disable logging on enable
filter add sshd_block interface any direction in action block protocol tcp srcport 0-65535 dst self dstport 22 state disable logging on enable
filter6 add seil_ctl_lan0 interface lan0 direction in action pass protocol tcp src fe80::/10 srcport 0-65535 dst self dstport 0-65535 state disable logging off enable
filter6 add telnetd_block interface any direction in action block protocol tcpudp srcport 0-65535 dst self dstport 23 state disable logging on enable
filter6 add httpd_block interface any direction in action block protocol tcpudp srcport 0-65535 dst self dstport 80 state disable logging on enable
filter6 add sshd_block interface any direction in action block protocol tcpudp srcport 0-65535 dst self dstport 22 state disable logging on enable
nat timeout 900
nat logging off
nat upnp off
nat upnp interface (null)
proxyarp disable
dhcp disable
dhcp mode server
dhcp6 client disable
dhcp6 client interface lan0
dns forwarder disable
ntp enable
ntp mode client
ntp server add 192.168.56.1
cbq link-bandwidth 100Mbps
snmp disable
snmp community "public"
snmp security-model community-based on
snmp security-model user-based on
snmp trap disable
syslog debug-level off
syslog remote off
translator timeout 300
resolver enable
resolver address add 192.168.56.1
rtadvd disable
httpd enable
sshd hostkey rsa1 none
sshd hostkey rsa
:
省略
:
sshd hostkey dsa
:
省略
:
sshd enable
telnetd enable
vendor OEM
gw#
これで、初期設定終了です。
PPPPoE IPv6の接続
PPPoE IPv6の設定は、公式ではこちらで解説しています。
ちょっと、自分なりにアレンジしたので、その説明をしておきます。
 1. ppp add ipv6 keepalive none ipcp disable ipcp-address off ipcp-dns off ipv6cp enable authentication-method chap identifier <ppp account> passphrase <ppp password> tcp-mss auto
 2. interface pppoe0 ppp-configuration ipv6
 3. interface pppoe0 over lan0
 4. route6 add default pppoe0
 5. dhcp6 client enable
 6. dhcp6 client interface pppoe0
 7. dhcp6 client prefix-delegation subnet lan0 sla-id 0x0 enable
 8. dhcp6 server interface lan0 enable
 9. dhcp6 server interface lan0 dns add 2001:2c0:cd03:ca00::4
 9-1. dhcp6 server interface lan0 domain add lo.zeke.ne.jp
 9-2. dhcp6 server interface lan0 sntp add 2001:2c0:cd03:ca00::4
10. rtadvd enable
11. rtadvd interface lan0 enable
12. rtadvd interface lan0 other-flag on
13. rtadvd interface lan0 advertise manual
13-1. rtadvd interface lan0 dns add 2001:2c0:cd03:ca00::4
13-2. rtadvd interface lan0 domain add lo.zeke.ne.jp
14. rtadvd interface lan0 advertise add interface-prefix
1.及び2.は公式ページ通り、PPPoEの接続設定ですね。
3.ではPPPoEの通るインターフェースをlan0にしています。接続する口が一つしかないので。
4.からdhcp6の設定になりますが、
7. dhcp6 client prefix-delegation subnet lan0 sla-id 0x0 enable7.で sla-idを0x0に変更しています。
dhcpv6クライアントで、上位のプロバイダから”2001:2c0:cd03:ca00::/56″で配布されます。
これは、”2001:2c0:cd03:ca00::/64″~”2001:2c0:cd03:caff::/64″まで使えますが、sld-id 0x1だと”2001:2c0:cd03:ca01::/64″を使うという意味になります。
他のルータ(リプレースしたRTX830)だと、こんな細かい指定方法がないので、今回はsla-id 0x0として、”2001:2c0:cd03:ca00::/64″を使うことにします。
(あれ?今見てみると”2001:2c0:cd03:cafe::/64″も使えますね!IPv6のアドレスは長いので、覚えやすいのは、うれしいかも。)
9.では公式サイトでは、上位のdhcpサーバからの情報をそのままローカルに流していますが、LAN内のDNSサーバなどを指定するため変更しています。9-1.9-2.も同様です。
radvd(ルータ広告)の設定も同様で、LAN内のDNSサーバを指定するため、
13. rtadvd interface lan0 advertise manual13.でmanualを指定して、13-1. 13-2.でDNSサーバなどを指定しています。
gw# ntp server add 2001:2c0:cd03:ca00::4
gw# resolver address add 2001:2c0:cd03:ca00::4
gw#
IPv6が有効になったのなら、ルータの参照するntpやdnsサーバもIPv6で入れておきたいですね。
IPv6のフィルタ設定
IPv6はグローバルなIPアドレスなので、接続しているすべてのパソコンがインターネット上から参照することができます。
IPv4でもnatができる前は、同様に接続していたのですが、今は悪意ある人が覗きに来ることがあるので、ファイアウォールが必要になってしまいましたね。
で、こんなフィルタ設定をします。
gw# filter6 add pass_icpm interface pppoe0 direction in/out action pass protocol ipv6-icmp state disable logging on enable
gw# filter6 add pass_dhcp interface pppoe0 direction in action pass protocol udp srcport 0-65535 dst fe80::/10 dstport 546 state enable logging on enable
gw# filter6 add outgoing interface pppoe0 direction out action pass state enable logging off enable
gw# filter6 add pass_domain interface pppoe0 direction in action pass protocol tcpudp srcport 0-65535 dst 2001:2c0:cd03:ca00::4/128 dstport 53 state disable logging off enable
gw# filter6 add pass_httpd interface pppoe0 direction in action pass protocol tcpudp srcport 0-65535 dst 2001:2c0:cd03:ca00::4/128 dstport 80 state disable logging on enable
gw# filter6 add pass_https interface pppoe0 direction in action pass protocol tcpudp srcport 0-65535 dst 2001:2c0:cd03:ca00::4/128 dstport 443 state disable logging on enable
gw# filter6 add pass_ftpd interface pppoe0 direction in action pass protocol tcpudp srcport 0-65535 dst 2001:2c0:cd03:ca00::4/128 dstport 21 state disable logging on enable
gw# filter6 add pass_sshd interface pppoe0 direction in action pass protocol tcpudp srcport 0-65535 dst 2001:2c0:cd03:ca00::4/128 dstport 22 state disable logging on enable
gw# filter6 add block_in interface pppoe0 direction in action block state disable logging on enable
gw#
icmp_v6については、pingに反応するだけではなく、通信の制御に必要なので、inとoutのすべてを通しておきます。(pass_icpm)
ルータがdhcpクライアントとして動作するために、宛先リンクローカル(fe80::/10)のポート546番宛の通信は通します。(pass_dhcp)
LAN内から外に出ていくパケット及びその応答パケットは通します。(outgoing)
インターネットから公開しているサーバに届いたパケットは通します。(pass_domain~pass_sshd)
それ以外のインターネットから来たパケットは拒否します。(block_in)
SEIL/x86のfilterは定義した順番に評価します。例えば、あとからポート25番を公開したいと思って、
gw# filter6 add pass_smtp interface pppoe0 direction in action pass protocol tcpudp dst 2001:2c0:cd03:ca00::4/128 dstport 25
gw#
と、入力しても
gw# show config filter6
filter6 add seil_ctl_lan0 interface lan0 direction in action pass protocol tcp src fe80::/10 srcport 0-65535 dst self dstport 0-65535 state disable logging off enable
filter6 add telnetd_block interface any direction in action block protocol tcpudp srcport 0-65535 dst self dstport 23 state disable logging on enable
filter6 add httpd_block interface any direction in action block protocol tcpudp srcport 0-65535 dst self dstport 80 state disable logging on enable
filter6 add sshd_block interface any direction in action block protocol tcpudp srcport 0-65535 dst self dstport 22 state disable logging on enable
filter6 add pass_icpm interface pppoe0 direction in/out action pass protocol ipv6-icmp state disable logging on enable
filter6 add pass_dhcp interface pppoe0 direction in action pass protocol udp srcport 0-65535 dst fe80::/10 dstport 546 state enable logging on enable
filter6 add outgoing interface pppoe0 direction out action pass state enable logging off enable
filter6 add pass_domain interface pppoe0 direction in action pass protocol tcpudp srcport 0-65535 dst 2001:2c0:cd03:ca00::4/128 dstport 53 state disable logging off enable
filter6 add pass_httpd interface pppoe0 direction in action pass protocol tcpudp srcport 0-65535 dst 2001:2c0:cd03:ca00::4/128 dstport 80 state disable logging on enable
filter6 add pass_https interface pppoe0 direction in action pass protocol tcpudp srcport 0-65535 dst 2001:2c0:cd03:ca00::4/128 dstport 443 state disable logging on enable
filter6 add pass_ftpd interface pppoe0 direction in action pass protocol tcpudp srcport 0-65535 dst 2001:2c0:cd03:ca00::4/128 dstport 21 state disable logging on enable
filter6 add pass_sshd interface pppoe0 direction in action pass protocol tcpudp srcport 0-65535 dst 2001:2c0:cd03:ca00::4/128 dstport 22 state disable logging on enable
filter6 add block_in interface pppoe0 direction in action block state disable logging on enable
filter6 add pass_smtp interface pppoe0 direction in action pass protocol tcpudp srcport 0-65535 dst 2001:2c0:cd03:ca00::4/128 dstport 25 state disable logging on enable
gw#
pass_smtpの前に定義されてるblock_inに引っかかって、期待通りの動作をしません。
gw# filter6 move pass_smtp above block_in
gw# show config filter6
:
省略
:
filter6 add pass_sshd interface pppoe0 direction in action pass protocol tcpudp srcport 0-65535 dst 2001:2c0:cd03:ca00::4/128 dstport 22 state disable logging on enable
filter6 add pass_smtp interface pppoe0 direction in action pass protocol tcpudp srcport 0-65535 dst 2001:2c0:cd03:ca00::4/128 dstport 25 state disable logging on enable
filter6 add block_in interface pppoe0 direction in action block state disable logging on enable
gw#
こんなときは、filter6 move pass_smtp above block_inとコマンドを打って、フィルタの位置を変更しましょう。
こんなコンフィグができました。
gw# save-to stdout
hostname "gw"
timezone "Japan"
environment login-timer 86400
ppp add ipv6 keepalive none ipcp disable ipcp-address off ipcp-dns off ipv6cp enable authentication-method chap identifier <ppp account> passphrase <ppp password> tcp-mss auto
interface lan0 media auto
interface lan0 add 192.168.56.254/24
interface pppoe0 over lan0
interface pppoe0 ppp-configuration ipv6
bridge disable
bridge ip-bridging on
bridge ipv6-bridging on
route dynamic rip disable
route dynamic ospf disable
route dynamic bgp disable
route dynamic redistribute static-to-rip disable
route dynamic redistribute static-to-ospf disable
route dynamic redistribute ospf-to-rip disable
route dynamic redistribute rip-to-ospf disable
route dynamic redistribute connected-to-rip disable
route dynamic redistribute connected-to-ospf disable
route dynamic pim-sparse disable
route6 add default pppoe0
route6 dynamic ripng disable
route6 dynamic redistribute static-to-ripng disable
route6 dynamic redistribute connected-to-ripng disable
route6 dynamic pim-sparse disable
filter add seil_ctl_lan0 interface lan0 direction in action pass protocol tcp src 192.168.56.0/24 srcport 0-65535 dst self dstport 0-65535 state disable logging off enable
filter add telnetd_block interface any direction in action block protocol tcp srcport 0-65535 dst self dstport 23 state disable logging on enable
filter add httpd_block interface any direction in action block protocol tcp srcport 0-65535 dst self dstport 80 state disable logging on enable
filter add sshd_block interface any direction in action block protocol tcp srcport 0-65535 dst self dstport 22 state disable logging on enable
filter6 add seil_ctl_lan0 interface lan0 direction in action pass protocol tcp src fe80::/10 srcport 0-65535 dst self dstport 0-65535 state disable logging off enable
filter6 add telnetd_block interface any direction in action block protocol tcpudp srcport 0-65535 dst self dstport 23 state disable logging on enable
filter6 add httpd_block interface any direction in action block protocol tcpudp srcport 0-65535 dst self dstport 80 state disable logging on enable
filter6 add sshd_block interface any direction in action block protocol tcpudp srcport 0-65535 dst self dstport 22 state disable logging on enable
filter6 add pass_icpm interface pppoe0 direction in/out action pass protocol ipv6-icmp state disable logging on enable
filter6 add pass_dhcp interface pppoe0 direction in action pass protocol udp srcport 0-65535 dst fe80::/10 dstport 546 state enable logging on enable
filter6 add outgoing interface pppoe0 direction out action pass state enable logging off enable
filter6 add pass_domain interface pppoe0 direction in action pass protocol tcpudp srcport 0-65535 dst 2001:2c0:cd03:ca00::4/128 dstport 53 state disable logging off enable
filter6 add pass_httpd interface pppoe0 direction in action pass protocol tcpudp srcport 0-65535 dst 2001:2c0:cd03:ca00::4/128 dstport 80 state disable logging on enable
filter6 add pass_https interface pppoe0 direction in action pass protocol tcpudp srcport 0-65535 dst 2001:2c0:cd03:ca00::4/128 dstport 443 state disable logging on enable
filter6 add pass_ftpd interface pppoe0 direction in action pass protocol tcpudp srcport 0-65535 dst 2001:2c0:cd03:ca00::4/128 dstport 21 state disable logging on enable
filter6 add pass_sshd interface pppoe0 direction in action pass protocol tcpudp srcport 0-65535 dst 2001:2c0:cd03:ca00::4/128 dstport 22 state disable logging on enable
filter6 add block_in interface pppoe0 direction in action block state disable logging on enable
nat timeout 900
nat logging off
nat upnp off
nat upnp interface (null)
proxyarp disable
dhcp disable
dhcp mode server
dhcp6 client enable
dhcp6 client interface pppoe0
dhcp6 client prefix-delegation subnet lan0 sla-id 0x0 enable
dhcp6 server interface lan0 enable
dhcp6 server interface lan0 domain add lo.zeke.ne.jp
dhcp6 server interface lan0 dns add 2001:2c0:cd03:ca00::4
dhcp6 server interface lan0 sntp add 2001:2c0:cd03:ca00::4
dns forwarder disable
ntp enable
ntp mode client
ntp server add 192.168.56.1
ntp server add 2001:2c0:cd03:ca00::4
cbq link-bandwidth 100Mbps
snmp disable
snmp community "public"
snmp security-model community-based on
snmp security-model user-based on
snmp trap disable
syslog debug-level off
syslog remote off
translator timeout 300
resolver enable
resolver address add 192.168.56.1
resolver address add 2001:2c0:cd03:ca00::4
rtadvd enable
rtadvd interface lan0 enable
rtadvd interface lan0 other-flag on
rtadvd interface lan0 dns add 2001:2c0:cd03:ca00::4
rtadvd interface lan0 domain add lo.zeke.ne.jp
rtadvd interface lan0 advertise manual
rtadvd interface lan0 advertise add interface-prefix
httpd enable
sshd hostkey rsa1 none
sshd hostkey rsa
:
省略
:
sshd hostkey dsa
:
省略
:
sshd enable
telnetd enable
vendor OEM
gw#
その他、SEIL/x86でよく使うコマンド
最後に、よく使うコマンドを書いておきます。
gw# show logログを確認
gw# show status ppp pppoe0
Interface: pppoe0
  LCP state: starting
  IPCP state: initial
  IPv6CP state: initial
  BCP state: initial
  LCP negotiated options:
        none
  IPCP negotiated options:
        none
  IPv6CP negotiated options:
        none
  BCP negotiated options:
        none
  keepalive: disabled
gw#
gw# show status interface lan0
interface lan0:
Description=""
Status=link up, administratively up
MTU=1500
LastChange=2020/04/18 14:32:36
Ipkts=4591, Ierrs=0, Opkts=7210, Oerrs=0, Colls=0
InOctets=450104, OutOctets=1779885, InDrops=0, OutDiscards=0
InUnknownProtos=0
Media=auto (1000baseT Full-Duplex)
EthernetAddress=08:00:27:C6:0E:56
IP address=192.168.56.254 netmask=255.255.255.0 broadcast=192.168.56.255
IPv6 address=fe80::a00:27ff:fec6:e56%lan0 prefixlen=64 scopeid 0x1
gw#gw# show status dhcp6
========================================
DHCPv6 client: running
----------------------------------------
Interface: pppoe0
State: selecting
Client DUID: 00:03:00:01:08:00:27:c6:0e:56
========================================
DHCPv6 server: running
----------------------------------------
Interface: lan0
Server DUID: 00:03:00:01:08:00:27:c6:0e:56
========================================
DHCPv6 relay: not running
gw#gw# show status rtadvd
lan0:
Interface Status: UP
Last RA sent: Sat Apr 18 20:20:37 2020
Next RA will be sent: Sat Apr 18 20:25:58 2020
VRRPv3: NONE (not configured)
Cancel out unknown RAs (anti-rogue): OFF
waits: 0, initcount: 3
statistics: RA(out/in/inconsistent): 33/0/0, RS(input): 0
Link-layer address: 08:00:27:c6:0e:56
DefaultLifetime: 1800, MaxAdvInterval: 600, MinAdvInterval: 200
Flags: O, Preference: medium, MTU: (none)
ReachableTime: 0, RetransTimer: 0, CurHopLimit: 64
Recursive DNS servers:
2001:2c0:cd03:ca00::4 (lifetime: 3000)
Domain search lists:
lo.zeke.ne.jp (lifetime: 3000)
gw#各種、状態を確認します。
gw# disconnect pppoe0
gw# connect pppoe0
gw#
pppを接続、切断。
補足
今まで、NICを1つしか使っていなかったので気が付かなかったのですが、VirtualBoxでネットワークアダプタの数を増やすと、SEIL/x86では不規則なlanインターフェース名に割り当てられます。
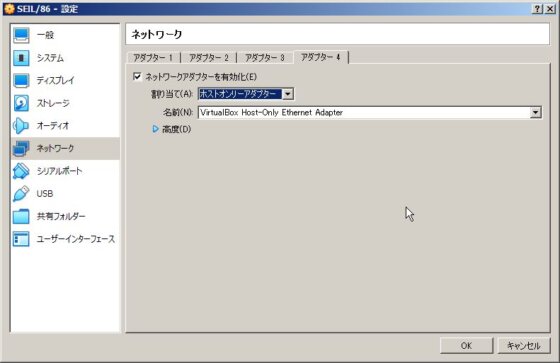
ネットワークアダプタが一つの場合
アダプター 1 → lan0
ネットワークアダプタが二つの場合
アダプター 1 → lan1
アダプター 2 → lan0
ネットワークアダプタが三つの場合
アダプター 1 → lan2
アダプター 2 → lan0
アダプター 3 → lan1
ネットワークアダプタが四つの場合
アダプター 1 → lan3
アダプター 2 → lan0
アダプター 3 → lan1
アダプター 4 → lan2
むやみに、アダプターを増やすと「あれっ?つながらない!」ということになるので、気をつけましょう。
と、このようにSEIL/x86を使っていました。
この前、ルータをYAMAHAのRTX830にリプレースしたので、それについても書いておこうと思います。
お勧めのKindle本です!


コメント